Hey Friend. Last year, industry reports indicated that nearly 40% of first-time applicants walked away from the DMV without their license because they stumbled over a single air brake step. It’s one thing to know what a pushrod is, but it’s another to explain why it matters while your heart is racing and the automatic fail of the air brake test looms over your head. We’ve all been there, feeling the weight of the cdl pre trip inspection checklist and wondering if we’ll remember the difference between cracked, bent, or broken and properly mounted and secure when the pressure is on.
The Truckermann knows that the sheer volume of parts to memorize is overwhelming, and the gap between passing the test and surviving a roadside DOT inspection can feel a mile wide. I promise to give you a veteran-led guide that helps you master a clear, repeatable sequence to build your confidence and protect your livelihood. You’re going to learn a memorizable routine for every component and the exact phrases to use so the examiner knows you’re a pro. We’ll walk through the engine compartment, the cab interior, and the trailer connections to ensure you never miss a bolt or a buzzer again. The road runs through us.
Key Takeaways
- Adopt the “Road Runs Through Us” mindset to transform your inspection from a regulatory chore into your strongest defense against legal liability and road accidents.
- Learn how to systematically clear the engine compartment by focusing on the “Big Three” fluids and front axle components using our veteran-verified cdl pre trip inspection checklist.
- Master the critical mechanical links of the coupling system and cab integrity to ensure your trailer stays exactly where it belongs-locked tight behind you.
- Protect your license by perfecting the “make or break” air brake test and verifying that every piece of required safety gear is charged and ready for a DOT officer’s eyes.
- Move beyond just passing the exam by integrating pre-trip, mid-trip, and post-trip habits that build the professional identity of a seasoned road veteran.
Mastering the CDL Pre-Trip Inspection Mindset
Hey friend, let’s get one thing straight before you even touch a door handle. The cdl pre trip inspection checklist isn’t just a hurdle the government puts in your way. It’s your first line of defense against a world of trouble. When you’re out there behind that wheel, your rig is your responsibility. A lazy walkaround isn’t just a risk to your safety; it’s a direct threat to your legal liability and your livelihood. At The Truckermann, we live by the philosophy that “The Road Runs Through Us.” This means safety isn’t some boring chore you do because a boss told you to. It’s your professional identity. It’s the mark of a veteran who respects the machine and the lives sharing the asphalt.
Every solid inspection starts with the “3 Ls” mnemonic: Leaks, Leans, and Lights. Before you get your hands dirty, stand back and look at the big picture. Are there puddles forming under the engine? Is the trailer leaning to one side, signaling a suspension or load shift issue? Are all your lenses clear and functional? Neglecting these basics leads to heavy consequences. The FMCSA reported that vehicle maintenance issues accounted for a staggering percentage of out-of-service violations in recent years. Those CSA points don’t just hurt your company; they follow your Commercial Driver’s License (CDL) like a shadow, making you a target for every scale house from here to the coast.
Test Day vs. The Real World
There’s a big difference between passing your exam and running a daily route. During the CDL exam, you have to “over-verbalize” every single nut and bolt to prove you know the components. In the real world, your focus shifts to active failure points. You should live by the general mantra for every part you touch: metal should be “not cracked, bent, or broken,” and rubber should have “no abrasions, bulges, or cuts.” For professional fleets, the Driver Vehicle Examination Report (DVER) is your shield. It creates a legal paper trail showing you did your due diligence before the wheels started turning.
Preparation and Order of Operations
Success in this industry comes down to habits. You need to start your cdl pre trip inspection checklist in the exact same spot every single time. This builds the muscle memory required to spot a loose lug nut or a frayed air line even when you’re tired or the weather is hitting 10 degrees. If you want to understand how this routine fits into broader regulatory standards, take a look at our DOT Inspection Level 1 Checklist. Once you climb into the cab, the “Safe Start” procedure is your foundational first step. Always verify the brakes are set and the gearshift is in neutral before you ever engage the starter. Doing things out of order is how accidents happen in the yard.
Under the Hood: The Engine Compartment and Front Axle
Hey Friend, popping the hood is where the real work begins. It is not just a formality; it is your first line of defense against a breakdown that could leave you stranded or facing a heavy DOT fine. When you approach the engine, think of it in two halves. On the passenger side, you are typically looking at your alternator and water pump. On the driver side, you will find your air compressor and power steering pump. You must identify whether these components are belt-driven or gear-driven. If it is belt-driven, check that the belt has no more than 3/4 inch of play and shows no signs of fraying or cracking.
Your cdl pre trip inspection checklist must prioritize the “Big Three” fluids: Oil, Coolant, and Power Steering. You are checking for two things: proper levels and the absence of leaks. For every hose you touch, use the standard verbal script: “No abrasions, bulges, or cuts (ABCs), and no audible leaks.” This level of detail is mandated by the FMCSA Pre-Trip Inspection Regulation, which requires every driver to be satisfied that the vehicle is in safe operating condition before hitting the pavement. If you need to upgrade your gear before your next run, check out some professional-grade tools and things to keep your rig tip-top.
The Steering System and Suspension
The steering system is what keeps you between the lines, so don’t rush this. Inspect the steering column for binds and ensure the gearbox is securely mounted with no missing bolts. Look closely at the linkage, specifically the pitman arm, drag link, and tie rod. Every connection needs its castle nuts and cotter pins in place. For the suspension, examine the leaf springs for shifts or cracks. A single cracked, broken, or missing leaf spring is an immediate Out-of-Service (OOS) violation because it compromises the structural integrity and steering geometry of your front axle. Finish by checking the shock absorbers for any signs of hydraulic fluid leaking from the seals.
Front Brakes and Steer Tires
Your front brakes use a 5-component system that requires a rhythmic check. You must inspect the brake hoses for leaks, the brake chambers for dents, and the slack adjusters for proper travel (no more than 1 inch when pulled by hand). Look at the brake drums for heat cracks and ensure the linings are at least 1/4-inch thick with no oil or grease contamination.
Finally, your steer tires are your lifeline. According to federal standards, steer tires must have a minimum tread depth of 4/32-inch, and unlike drive tires, recaps are strictly prohibited on the steering axle. Inspect the rims for “spiderweb” cracks or unauthorized welds that suggest metal fatigue. Ensure all lug nuts are tight, looking for rust trails or shiny threads that indicate a loose nut. This thoroughness ensures your cdl pre trip inspection checklist protects both your license and your life.
The Walkaround: Cab, Coupling, and Trailer Integrity
Hey Friend, it’s time to move toward the side of the rig. The Truckermann knows that what you see here determines if you’re hauling freight or sitting in a weigh station parking lot. Start with your mirrors and door. Ensure the hinges are secure and the seals aren’t dry-rotted. Your fuel tank is next. You need to check the mounting straps and the rubber gaskets; there shouldn’t be any shiny metal or leaks. This is a vital part of your cdl pre trip inspection checklist because a loose tank is an immediate out-of-service violation. Ensure the cap is tight and the venting system isn’t clogged with road grime.
The Fifth Wheel and Coupling Logic
The coupling system is the most critical mechanical link for any Class A driver. You’re looking for a “no gap” status between the trailer apron and the fifth wheel skid plate. Ensure the skid plate has plenty of grease to prevent steering issues. Check that the locking jaws have fired completely around the kingpin shank, not the head. Your air lines and the electrical pigtail must be suspended high enough to avoid dragging. Check the glad hands for cracked seals and ensure the pigtail is free of corrosion or exposed copper. If those lines fail, your trailer brakes will lock up or your lights will go dark, ending your day early.
Drive Axles and Trailer Suspension
The trailer body demands a top-to-bottom glance. Your header board should be free of bulges or holes that could let cargo shift. Check the side panels for missing rivets or structural cracks. Federal law requires DOT C2 reflective tape to cover at least 50 percent of the trailer’s length. Finally, move to the rear. Your mudflaps can’t be more than 8 inches from the ground or they won’t stop debris effectively. Verify that your tail lights work and the amber ABS indicator lamp cycles on and off when you apply power. This is how we stay safe and keep the wheels turning. Remember, the road runs through us, and keeping this equipment tight is how we protect the brotherhood.
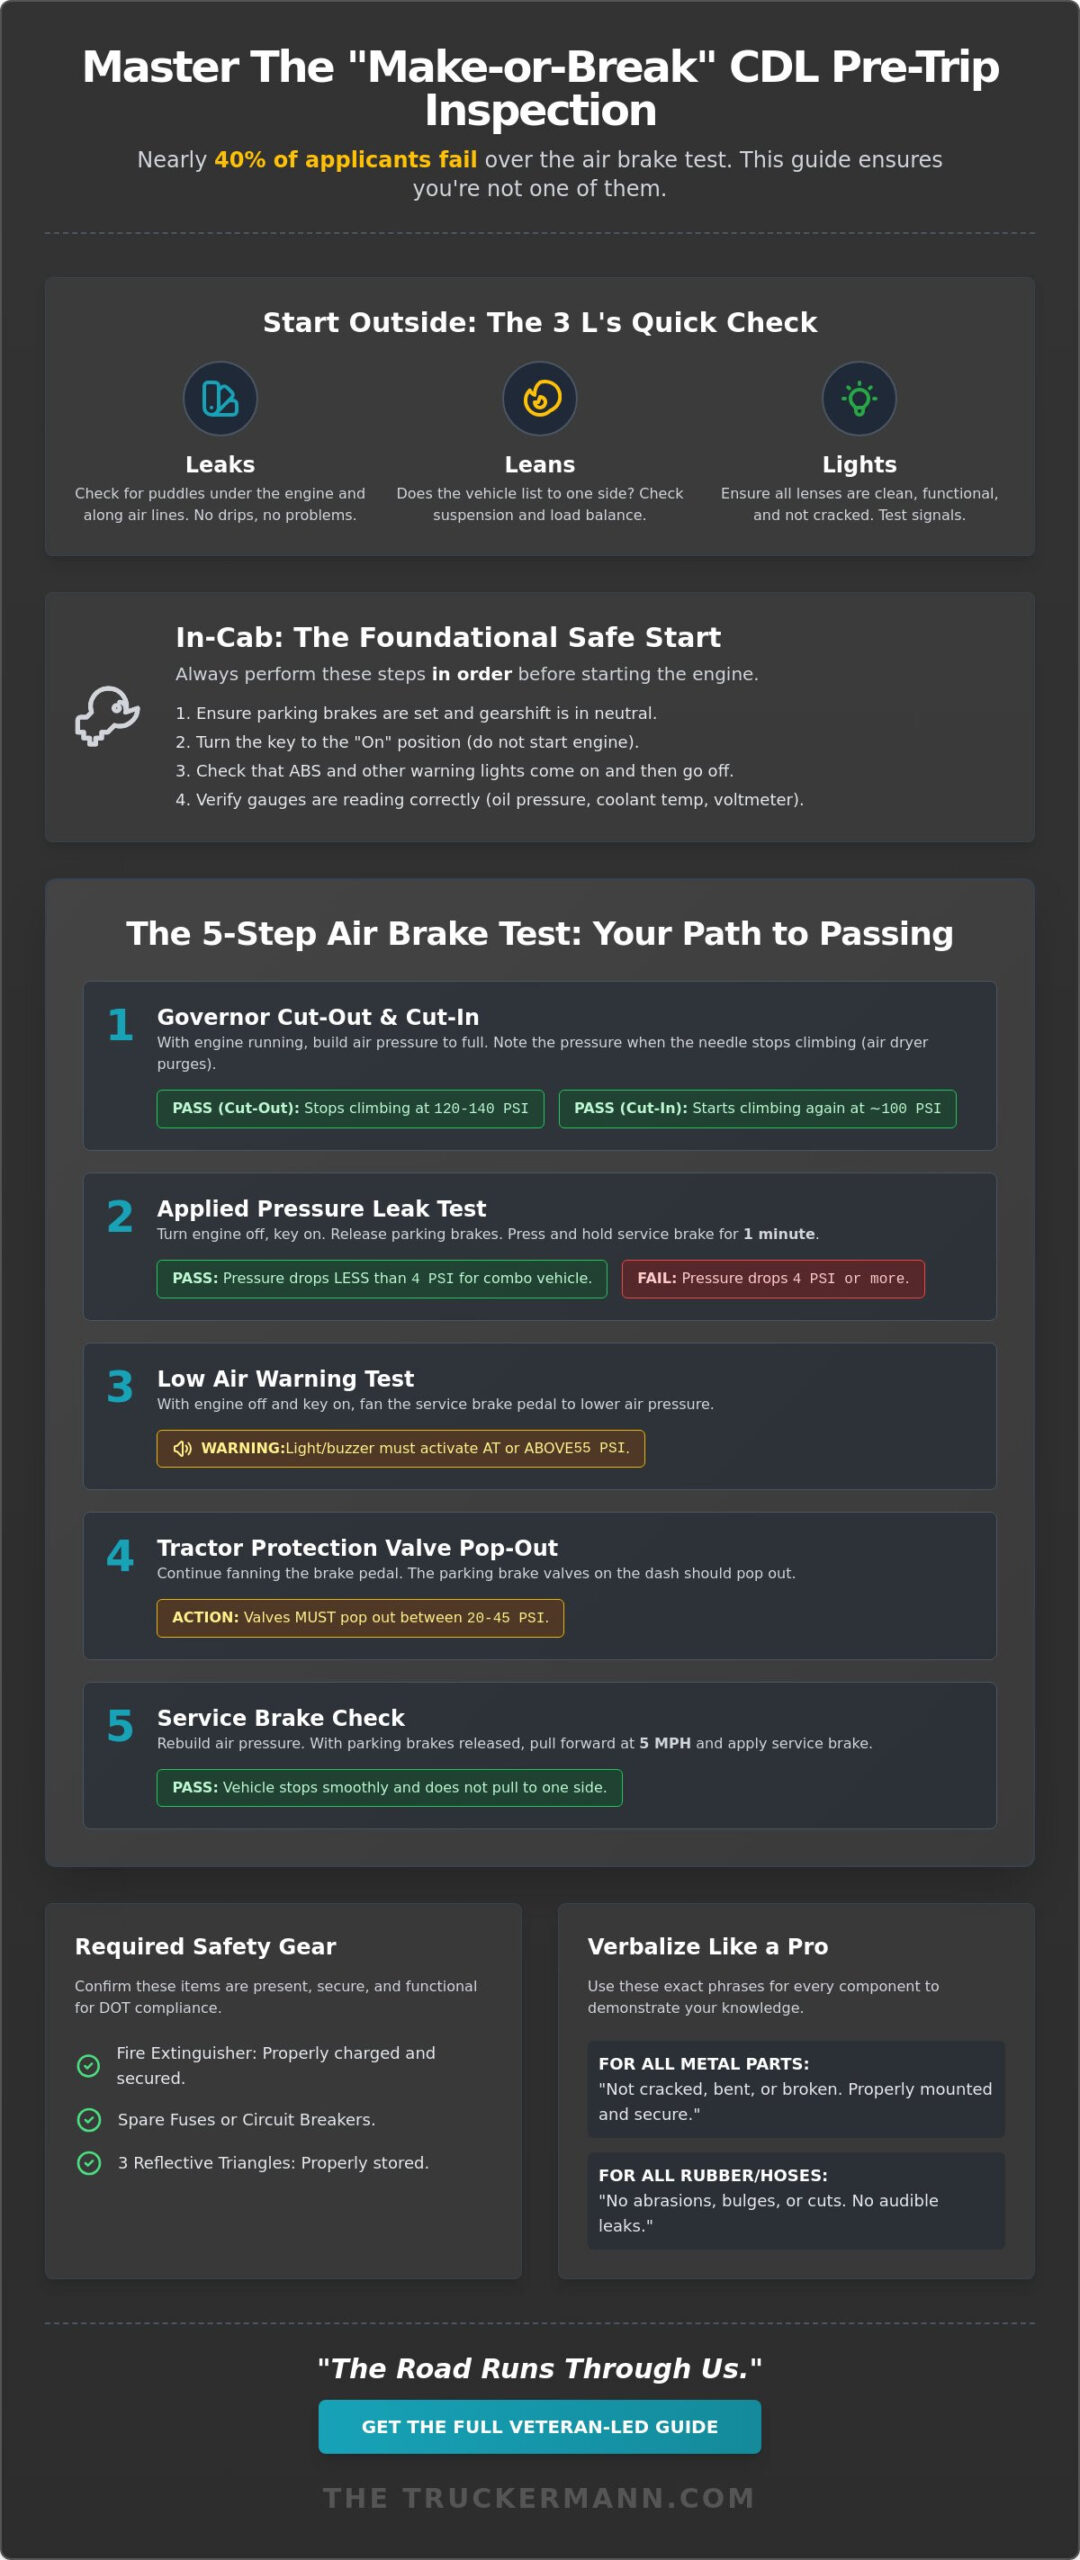
The In-Cab Inspection and the “Make or Break” Air Brake Test
Hey Friend, let’s step inside the cockpit. This is where the rubber meets the road for your exam. The examiner is going to climb in right next to you, and they’ll be watching every move you make with a clipboard in hand. This section of the cdl pre trip inspection checklist is the most critical because it includes the air brake test. If you miss a single step there, the test ends immediately. You won’t just get a point deduction; you’ll be headed home without your license.
Start by showing you’re prepared for any emergency. Point out your fire extinguisher and verify it’s B-C rated, fully charged, and the safety pin is in place. You also need to confirm you have three red reflective triangles and a box of spare electrical fuses. If your rig uses circuit breakers, tell the examiner that instead. This shows you actually know the specific machine you’re operating, not just a memorized list from a book.
Next, move to your glass and gauges. Your windshield must be clean with no illegal stickers or obstructions. Check for cracks; anything larger than 1 inch is usually a violation. Turn the key to perform a “safe start” and watch your needles. Your oil pressure should begin to rise within seconds of the engine turning over. Your voltmeter should sit steady between 12 and 14 volts, proving the alternator is doing its job. Finally, check that your primary and secondary air gauges are functional and not leaking.
The 7-Step Air Brake Test Procedure
This is the moment of truth. You must perform these steps in the exact order to pass. The Truckermann recommends practicing this until you can do it in your sleep.
- Applied Leakage Test: With the engine off and brakes released, hold the brake pedal down for 60 seconds. You cannot lose more than 3 PSI for a straight truck or 4 PSI for a combination vehicle.
- Low Air Warning: Fan the brake pedal repeatedly. The warning light and buzzer must activate before the pressure drops below 60 PSI.
- Spring Brake Pop-out: Continue fanning the brakes. Both the tractor and trailer protection valves should pop out when the pressure hits the 20 to 45 PSI range.
- Safe Start: Place the truck in neutral and restart the engine to build pressure.
- Governor Cut-out: Script Tip: “I am checking that my primary and secondary gauges are building to governor cut-out between 120-140 PSI.”
- Trolley/Trailer Brake Check: Set the trailer brakes and gently tug against them in a low gear to ensure they hold the weight.
- Service Brake Check: Roll forward at approximately 5 mph and apply the foot brake. Ensure the truck stops smoothly and doesn’t pull to the left or right, which could indicate a brake adjustment issue.
Final Cab Checks: Horns, Heat, and Seatbelts
Don’t let your guard down once the air brakes are done. You still need to demonstrate that your “city” electric horn and your loud air horn are both working. Check that your heater and defroster can blast enough air to keep the windshield clear during a December freeze. One common “gotcha” for examiners is the seatbelt. Pull it all the way out to check for frays or cuts in the fabric. Ensure it latches securely and stays locked. If that belt is damaged, the truck is technically out of service.
Mastering these details proves you’re a professional who respects the equipment. To find the best gear for your daily haul, check out our collection of premium trucking tools and safety accessories.
Beyond the Test: Real-World Habits and the Inspector’s Kit
Hey Friend, passing the DMV exam is just the handshake. The real work begins when you’re responsible for 80,000 pounds of steel moving at 65 miles per hour. Transitioning from a student to a professional means you stop looking at the cdl pre trip inspection checklist as a hurdle and start seeing it as your primary defense. Professional drivers don’t just “check” their rigs; they master them. This mindset creates a continuous safety loop consisting of your pre-trip, mid-trip walk-arounds during fuel stops, and a solid post-trip to catch issues before they park for the night. Before you can master the inspection, though, you need to make sure you trained at an ELDT-compliant CDL commercial trucks training LLC that actually prepares you for real-world inspections and roadside scrutiny.
Staying diligent keeps you off the radar during the annual CVSA Roadside Inspection Blitz. During the 2023 blitz, nearly 19 percent of vehicles inspected were placed out-of-service for mechanical violations. Most of those issues, like worn brake pads or light failures, are caught by a five-minute walk-around. A clean pre-trip prevents these headaches and protects your CSA score. Seasoned veterans also know that the environment dictates the inspection. When temperatures drop below 32 degrees, you must check for ice buildup in air lines. Conversely, when the summer sun hits 100 degrees, your tire pressure can spike 10 to 15 psi, requiring a closer look at your tread integrity. Understanding how your inspection requirements may shift depending on whether you’re running interstate vs intrastate routes is another layer of compliance every serious driver needs to master.
The Truckermann’s Recommended Gear
You can’t inspect what you can’t see. A high-lumen LED flashlight is non-negotiable for those 3 AM starts when you need to spot hairline cracks in a leaf spring or a slow drip from the water pump. While many drivers rely on “kicking the tires” or using a wooden thumper, a digital tire gauge provides the 100 percent accuracy required for modern fuel efficiency and safety standards. If you’re moving into specialized hauling, check out our guide on Best Flatbed Trucking Gear to round out your kit. Always wear your gloves and a high-visibility vest during your inspection. It isn’t just about safety; it establishes professional authority. When a DOT officer sees a driver in full gear performing a disciplined pre trip checklist CDL routine built to 2026 FMCSA standards, they know they’re dealing with a pro who doesn’t cut corners.
Maintaining Your Records
Your ELD is your legal witness. Always log your pre-trip time on Line 4: On-Duty, Not Driving. Most carriers require at least 15 minutes for this entry to prove you actually performed the check. If you find a defect that makes the truck unsafe, don’t “roll and hope.” Mark the pre-trip as “Failed” in your system and communicate immediately with dispatch and the shop. It’s better to lose two hours at the terminal than two days in a repair shop three states away. Stay vigilant out there, because your safety and your livelihood depend on the details. Keep your eyes open and your grease points wet. The Road Runs Through Us.
Master the Inspection and Protect Your Livelihood
Success behind the wheel starts long before you put the truck in gear. By mastering the 2026 FMCSA and CVSA standards, you ensure every engine component and air brake system meets the rigorous demands of the highway. Thousands of drivers already use this cdl pre trip inspection checklist to prepare for high-stakes Roadcheck blitzes, turning a complex legal requirement into a professional habit. This guide was built from real road experience by a professional driver who knows exactly what inspectors look for during a roadside stop. It’s about more than just passing a test; it’s about coming home safe every single night.
You’ve got the knowledge to stay compliant and keep the wheels turning. Now it’s time to make sure you have the physical tools to match your expertise. Having a reliable light and the right gear can be the difference between a clean inspection and a costly violation. Don’t leave your career to chance when you can be the most prepared driver on the lot.
Hey Friend, Ready to Gear Up? Check out the Truckermann’s Top Picks for Inspection Lights and Professional Gear here.
Stay vigilant and keep your equipment tight. We’re all in this together, and your dedication to excellence keeps the industry moving. The road runs through us.
Frequently Asked Questions
How long should a CDL pre-trip inspection take during the actual test?
You should expect the pre-trip inspection to take between 30 and 50 minutes during your official exam. While the FMCSA doesn’t mandate a strict time limit, most state examiners look for you to finish the process in under 45 minutes. If you take longer than an hour, you risk appearing unprepared or hesitant to the person grading your performance.
Can I fail my CDL test if I forget to check one light?
You won’t automatically fail for missing a single clearance light, but you’ll lose points on your score sheet. Most states require you to earn at least an 80% score to pass this portion of the exam. However, failing to properly check a major safety component like your air brakes or steering linkage results in an immediate 100% failure rate for that attempt.
What is the most common reason drivers fail the pre-trip inspection?
The air brake test is the top reason students fail, causing nearly 40% of all pre-trip failures according to national training data. If you miss a single step in the 3-step air brake check, the examiner must stop the test and fail you on the spot. You’ve got to memorize the specific PSI cut-off points for the low air warning and the emergency pop-out valves.
Is the pre-trip inspection different for a Class B CDL?
Yes, the Class B inspection is significantly shorter because you aren’t required to inspect a trailer or any coupling systems. While a Class A driver must examine the fifth wheel and kingpin, your Class B cdl pre trip inspection checklist focuses on the frame and rear of the single unit. This usually reduces the number of parts you need to identify by about 25% compared to Class A.
Do I need to get under the truck during the inspection?
You don’t need to crawl on your belly in the dirt, but you must lean in or squat to see specific components. Examiners expect you to physically point to parts like the drive shaft, brake chambers, and slack adjusters to prove you know where they’re located. If you can’t clearly see the part to check for cracks or leaks, you aren’t doing the job right.
What happens if I find a defect during my daily pre-trip on the job?
Is there a specific order I must follow for the CDL pre-trip exam?
There isn’t a federal law mandating a specific sequence, but following a logical flow from the engine to the rear prevents you from skipping parts. Most successful drivers use a consistent pre trip checklist CDL master template that starts under the hood before moving to the driver’s side fuel tank and tires. This rhythmic approach ensures you don’t miss a single bolt while the examiner is watching.
How do I memorize all the parts for the engine compartment check?
The best way to memorize the engine is to group parts into systems like cooling, steering, and electrical while using the “Point, Touch, and Name” method. Industry instructors recommend at least 20 hours of verbal practice before you head to the DMV for your test. The Truckermann suggests recording your own voice on your phone and listening to the script until the names of the parts become second nature. If you haven’t yet earned your license, make sure you’re enrolled in a reputable CDL commercial trucks training LLC with a fully ELDT-compliant curriculum so those hours of practice translate directly into exam success.
Disclaimer
The information provided on The TruckerMann is for general informational and educational purposes only. While every effort is made to ensure the accuracy and reliability of the content, trucking laws, FMCSA regulations, DOT requirements, safety standards, and industry policies can change at any time. Readers are encouraged to verify all information with official government agencies, professional advisors, or qualified industry professionals before making business, legal, financial, safety, or compliance-related decisions.
The content shared on this website reflects personal opinions, experiences, research, and commentary and should not be considered legal, financial, medical, tax, or professional advice. The TruckerMann and its owners, contributors, affiliates, or representatives are not responsible for any losses, damages, violations, penalties, or liabilities resulting from the use or misuse of information found on this website.
Some content on this website may contain affiliate links, sponsored content, or promotional material. This means we may earn a commission at no additional cost to you if you choose to purchase through certain links.
By using this website, you agree that you do so at your own discretion and risk.