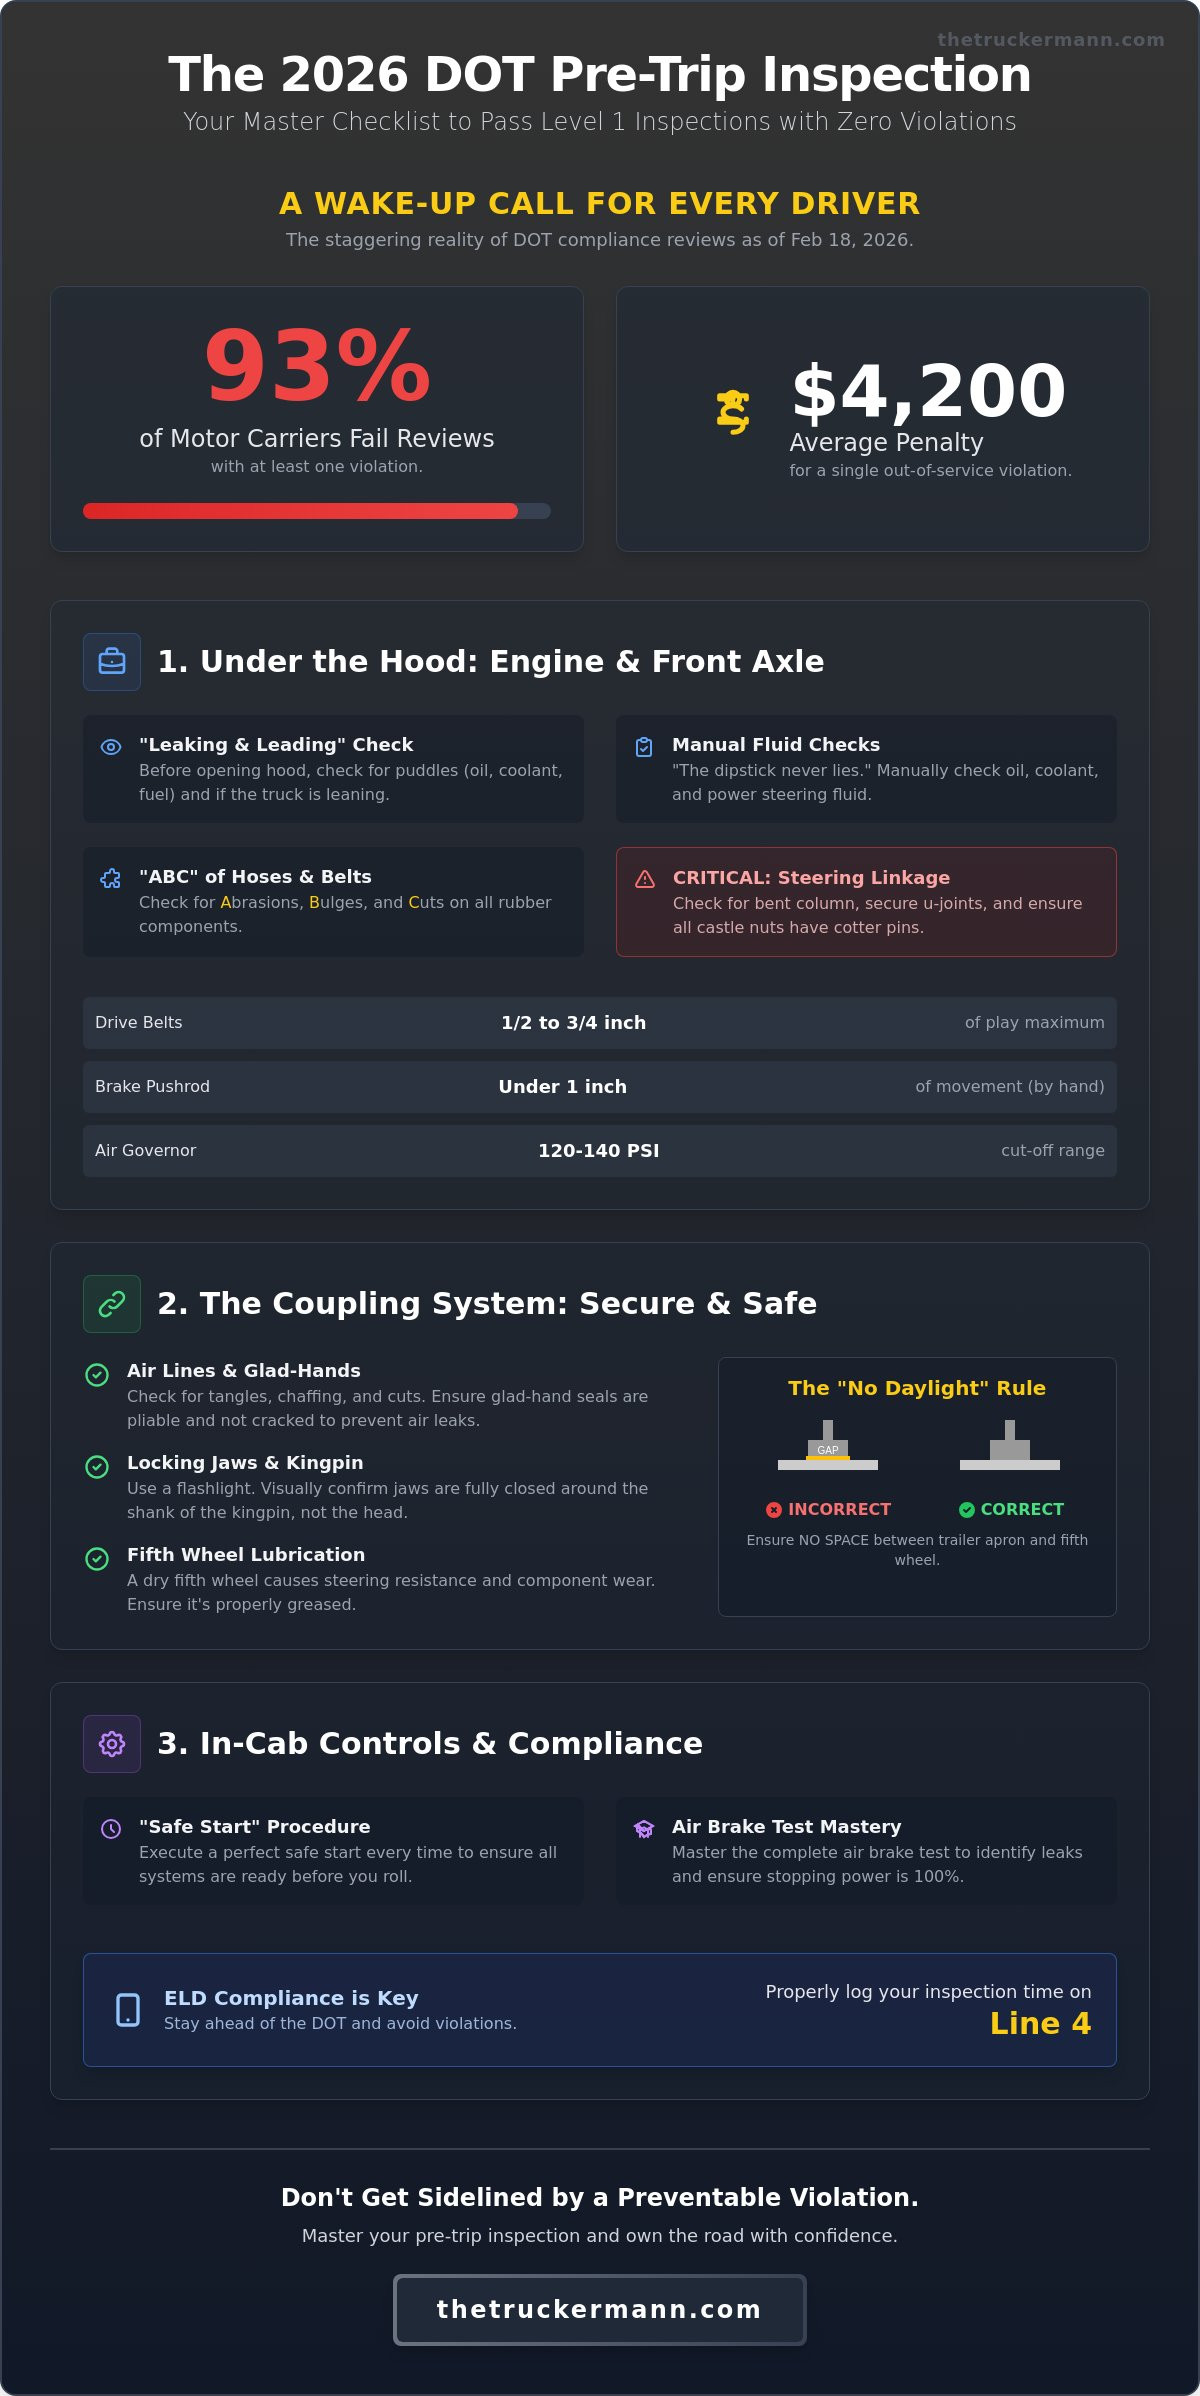
Hey Friend. Did you know that as of February 18, 2026, a staggering 93% of motor carriers fail their DOT compliance reviews with at least one violation? It is a wake-up call for every driver behind that wheel, especially when you consider that a single out-of-service violation now averages $4,200 in penalties. The Truckermann knows that the fear of a roadside blitz is real, and the confusion over technical brake components or a simple inconsistency in your routine can lead to a costly “Driver Observed” violation. That is why mastering your pre trip checklist cdl routine is not just a regulatory chore; it is your first line of defense to ensure the road runs through us.
I agree that keeping up with the FMCSA’s overhauled CSA model and its 116 grouped violation types feels like a heavy lift when you are just trying to get the miles in. You deserve an inspection routine that is efficient, repeatable, and professional enough to satisfy any inspector. This guide promises to provide you with a master template designed to keep you ahead of the DOT and help you pass Level 1 inspections with zero violations. We will break down the essential engine checks, simplify complex air brake tests, and show you how to audit your own rig for the latest 2026 safety standards.
Key Takeaways
- Identify critical engine defects early using the “Leaking and Leading” method to protect your equipment and your paycheck.
- Master the “No Daylight” rule for fifth wheel coupling to ensure your connection is secure and road-ready.
- Execute a perfect air brake test and “Safe Start” every time using our professional pre trip checklist cdl template.
- Stay ahead of the DOT by learning how to properly log your inspection time on Line 4 for full ELD compliance.
The Foundation: Why the CDL Pre-Trip Inspection is Your Best Friend
Hey Friend, let’s get real about why we’re here. The pre-trip inspection is more than just a regulatory hurdle or a few minutes of lost sleep. It is the most effective tool you have to protect your Commercial driver’s license (CDL) and your livelihood. By definition, a pre-trip is a systematic, step-by-step check of your tractor and trailer performed before you ever put that rig in gear. Whether you are starting a fresh shift or handling a trailer swap, this routine ensures you aren’
Under the Hood: The Engine Compartment and Front Axle Checklist
Your inspection begins before you even touch the hood latches. I call this the “Leaking and Leading” check. As you approach the rig, look for puddles of oil, coolant, or fuel on the pavement. If the truck is leaning to one side, you might have a shifted load or a collapsed suspension component. Catching these signs early saves you from wasting time on a truck that isn’t going anywhere. This high-level view is a vital part of any pre trip checklist cdl routine because it identifies major safety hazards before you get your hands dirty.
Once the hood is open, it’s time to verify fluid levels. Never trust the sensors on your dashboard alone. Electronic sensors can fail or give false readings, but the dipstick never lies. Check your oil, coolant reservoir, and power steering fluid manually. While you are there, look for the “ABC” of rubber components: Abrasions, Bulges, and Cuts. If a radiator hose looks swollen or a belt shows deep cracks, it is a sign of imminent failure. For those looking to upgrade their maintenance kit, checking out the latest Tools & Things can help you stay prepared for quick roadside fixes.
The steering linkage is where many drivers fail their DOT exams. You must ensure that the steering column is not bent and that all u-joints are secure. Pay close attention to the castle nuts and cotter pins. If a cotter pin is missing, that castle nut can vibrate loose, leading to a total loss of steering control at highway speeds. It’s a small detail that carries life-or-death consequences on the road.
Critical Engine Components
Check that the alternator and water pump are securely mounted and not leaking. The air compressor should be heard but not felt through excessive vibration. Listen closely for air leaks and verify the governor cut-off is working between 120 and 140 psi. During a 2026 inspection, any drive belt must have no more than 1/2 to 3/4 of an inch of play when pushed at the center of its longest span.
The Steer Axle and Suspension
When inspecting shock absorbers, distinguish between “misting” and actual leaks. A light film of oil is normal, but a dripping shock is a violation. Examine the leaf spring stack for any leaves that have shifted, cracked, or are missing entirely. Finally, check your brake chambers and slack adjusters. Under the 1-inch rule, the pushrod should not move more than one inch when pulled by hand with the brakes released. Mastering these technical details ensures your pre trip checklist cdl stands up to the toughest FMCSA scrutiny.
Coupling and the Trailer: Securing the Connection and the Cargo
Hey Friend, once you’ve cleared the engine compartment, it’s time to move to the most critical junction of your rig: the coupling system. The “No Daylight” rule is your golden standard here. You need to verify that there is no space between the trailer apron and the fifth wheel skid plate. If you see light, it means your trailer isn’t seated properly, which is a recipe for a dropped trailer on a busy highway. Proper lubrication is just as important. A dry fifth wheel causes steering resistance and unnecessary wear on your tractor. This part of your pre trip checklist cdl isn’t just about passing an exam; it’s about making sure your trailer stays behind you where it belongs.
Next, move your eyes to the air lines and pigtails. You’re looking for more than just basic connections. Check for tangles or chaffing against the tractor frame or the catwalk. If those lines rub through, you lose air pressure, and your spring brakes will lock up in the middle of traffic. Ensure the glad-hand seals are pliable and free of cracks. A leaking seal is a common culprit for failing a roadside air leakage test, and it’s a “Driver Observed” violation that’s easily avoided with a ten-second check.
Get under the trailer with a flashlight and look at the locking jaws. You must see that the jaws have closed completely around the shank of the kingpin, not the head. If the jaws are around the head, you have a “high hitch,” and that trailer will slide right off the back of the tractor as soon as you pull away. Finally, crank that landing gear all the way up and stow the handle securely. A low-hanging landing gear can catch on a railroad crossing or a steep driveway, leading to a stuck rig or a structural failure of the trailer frame.
The Fifth Wheel Area
Look for shiny metal or rust trails around the mounting bolts. These are tell-tale signs that the fifth wheel assembly is shifting under the pressure of the load. Check that the release arm is in the fully locked position with the safety latch engaged. If you’re running a sliding fifth wheel, verify that the locking pins are fully extended through the slide rail. This ensures your weight distribution remains legal and your handling stays predictable through every turn.
Trailer Securement and Body
Walk the length of the trailer and check your conspicuity tape. Federal law requires this reflective tape to be clean and cover at least 50% of the trailer side. For my brothers pulling open decks, you need to be extra vigilant. Inspect your straps and chains for any nicks, frays, or heat damage. A single 1/2-inch cut in a strap can render it illegal and unsafe. Lastly, check the rear impact guard. It must be structurally sound with no missing bolts or deep cracks, as this is a primary focus during a 2026 Level 1 DOT inspection. If you want to understand exactly what an officer examines during a roadside stop, reviewing the complete DOT inspection level 2 checklist for 2026 will show you every item on the walk-around that can trigger a violation. Mastering this pre trip checklist cdl routine is how you keep your cargo secure and your record clean.
The Command Center: In-Cab Controls and the Critical Air Brake Test
Hey Friend, it’s time to climb into the driver’s seat. After you’ve secured the exterior, the cab becomes your command center where you’ll verify the systems that keep you alive on the grade. Before you even think about the ignition, check your safety equipment. Your fire extinguisher must be fully charged with the pin in place; you need three red reflective triangles stowed and ready; and you must have spare electrical fuses for every major circuit. DOT inspectors frequently target these items during a roadside blitz because they’re easy to overlook when you’re focused on the heavy iron.
The “Safe Start” is your first operational test. Ensure the transmission is in neutral and the clutch is depressed before turning the key. As the engine breathes to life, watch your dashboard like a hawk. You’re looking for the ABS light to cycle on and then off. If that light stays on, you’ve got a sensor or system fault that counts as a “Driver Observed” violation under the 2026 CSA standards. Check your gauges immediately; oil pressure should rise within seconds, the voltmeter should show a steady charge, and your primary and secondary air tanks should build toward the 120 to 140 PSI governor cut-off. Ensuring these basics are part of your pre trip checklist cdl routine is how you avoid those $4,200 out-of-service penalties.
The 3-Step Air Brake Test (The ‘Leakers’ Test)
This is the make-or-break moment of any inspection. With your air tanks fully charged and the engine off, perform the Applied Pressure Test by holding the brake pedal down for one minute. You must lose no more than 4 PSI in that 60-second window for a combination vehicle. Next, fan the brakes to bleed off air; your low air warning light and buzzer must activate at or above 60 PSI. Finally, continue fanning the pedal until both the tractor and trailer protection valves “pop out.” This emergency feature should trigger between 20 and 45 PSI to prevent a total runaway. If you are preparing for your CDL skills test and want a step-by-step breakdown of every component you’ll be evaluated on, the complete guide to the pre trip inspection for CDL under the 2026 standards walks you through each stage with examiner-level detail. To ensure you have the right gear to fix any minor leaks you find, grab your professional-grade roadside repair tools before your next haul.
Internal Comfort and Visibility
Visibility is your best friend when you’re watching the miles roll by. Test your heater and defroster on all settings to ensure they can clear a frosted windshield during a winter storm. You must also verify that your windshield is free of illegal stickers and that your mirrors are clean and adjusted perfectly for your line of sight. Don’t forget to test both your city and air horns; communication is vital when the road gets unpredictable. Finish your in-cab pre trip checklist cdl by checking all indicator lights, including your high beams, turn signals, and four-way flashers, to ensure you’re visible to everyone else sharing the highway.
Mastering the Routine: How to Log and Optimize Your 2026 Pre-Trip
Hey Friend, you’ve checked the iron and the air. Now handle the digital trail. Line 4 on your logbook is your best friend for staying legal. In 2026, DOT auditors look at your time stamps as closely as they look at your tires. If you log only two minutes for a full inspection, they’ll know you’re pencil-whipping the report. You should log at least 15 to 30 minutes for a valid inspection to ensure you stay in the green. This is a core part of maintaining ELD compliance. If you’re moving before that clock hits the 15-minute mark, you’re inviting an audit that could lead to those safety-related penalties we discussed earlier.
The “Trucker Mann” walk-around method is all about building muscle memory. Start at the same spot, usually the driver’s side front corner, and work your way around the rig in a clockwise circle. If you follow the same path every morning, your eyes will catch a missing bolt or a leaking seal without you even thinking about it. Integrating your pre trip checklist cdl into this repeatable habit is the only way to ensure you never miss a technical detail when you’re tired or in a rush. Before you hit the gate, remember that “The Road Runs Through Us.” Do a final tug on your cargo securement gear to make sure nothing shifted while you were pre-tripping the cab.
Digital vs. Paper DVIRs
Digital Driver Vehicle Examination Reports (DVIRs) are the gold standard in 2026. They allow for instant communication with your fleet manager or shop foreman. If you find a defect, you can attach a clear photo of the issue directly to the report. This speeds up repairs and creates a verifiable digital paper trail that protects you during a roadside blitz. Just make sure your ELD is set to the correct “On-Duty, Not Driving” status before you touch your first lug nut.
The Veteran’s Final Walk-Around
Never pull out of the yard without a final “Lights and Tires” lap. This quick 60-second walk ensures no bulbs burned out while you were checking the engine and that your tires haven’t developed a sudden leak. Verify that your paperwork, including your registration, insurance, and IFTA stickers, is current and in the cab. If you’re in a slip-seat operation, closing the loop means signing off on the previous driver’s DVIR to acknowledge that any reported defects were repaired. This final step in your pre trip checklist cdl routine is what separates the professionals from the amateurs.
Protect Your Paycheck and Your Future Behind the Wheel
Hey Friend, the road is changing fast. With the FMCSA’s 2026 CSA model focusing on over 110 grouped violation types, your daily walkaround is your ultimate shield. We’ve mastered the “Leaking and Leading” checks and the critical three-step air brake test together. Mastering this pre trip checklist cdl routine isn’t just about avoiding a $4,200 out-of-service penalty; it’s about making sure you get home safely with your earnings intact. Remember that 93% of carriers were hit with violations in early 2026. Don’t let a simple loose bolt or a missing cotter pin be the reason you’re sidelined.
Gear up for your next inspection with pro-grade securement tools at Mytee Products. These solutions are used by thousands of professional drivers daily and are designed by truckers, for truckers, to be fully compliant with 2026 FMCSA standards. Stay vigilant and keep your eyes on the horizon. The Truckermann is always in your corner because the road runs through us.
Frequently Asked Questions
How long does a proper CDL pre-trip inspection take?
A thorough pre trip checklist cdl walkaround typically takes between 30 and 60 minutes to complete properly. While the FMCSA doesn’t mandate a specific clock time, logging at least 15 to 30 minutes on Line 4 ensures you have enough time to actually inspect the 116 grouped violation types now tracked under the 2026 CSA model. Skipping steps to save ten minutes isn’t worth the risk of a roadside violation.
Can I get a DOT violation if I don’t log my pre-trip on my ELD?
Yes, failing to log your inspection on your ELD can result in a “Form and Manner” violation during a roadside inspection. Since February 18, 2026, data shows that 93% of motor carriers fail compliance reviews due to similar documentation gaps. If you’re moving the wheels without an on-duty log entry, you’re signaling to the DOT that you skipped your safety checks.
What are the most common items missed during a pre-trip?
Drivers most often miss the smaller “Driver Observed” violations like the ABS light failing to cycle or a missing fire extinguisher pin. Brake pushrod travel exceeding the 1-inch limit and frayed air lines are also high on the list. These small oversights contribute to the $4,200 average penalty for out-of-service violations recorded in 2026.
Is a pre-trip inspection required for every trip or just once a day?
You must perform an inspection at the start of every duty day and whenever you swap equipment or pick up a new trailer. Even if you’ve already driven 500 miles, picking up a different trailer requires a fresh check of the coupling and trailer systems. It’s about ensuring the rig is safe before every single segment of your haul.
What happens if I find a defect during my pre-trip?
If you find a defect, you must document it on your Driver Vehicle Inspection Report (DVIR) immediately. If the defect is an out-of-service item, such as a flat tire or a major air leak, the vehicle cannot legally operate until the repair is finished and signed off. Identifying these issues on the yard prevents a $33,728 maximum safety penalty on the highway.
Do I need to check the trailer if I am only bobtailing?
You don’t need to check trailer components when bobtailing, but you must still inspect the tractor’s rear lighting, tires, and the fifth wheel area. Ensure your air lines and pigtails are secured so they don’t drag or tangle. Even without a trailer, your pre trip checklist cdl must cover every part of the power unit to remain compliant.
What is the difference between a pre-trip and a post-trip inspection?
The pre-trip is your personal safety check to ensure the rig is roadworthy before you start, while the post-trip is a legally mandated report of defects found during your shift. Under 49 CFR 396.11, you must submit a written DVIR at the end of the day if any defects were discovered. The post-trip helps the next driver or the shop address issues before the next run.
How do I perform an air brake test on a manual vs. automatic transmission?
The air brake test steps remain identical for both manual and automatic transmissions, though the “Safe Start” differs slightly. On a manual, you must depress the clutch and verify the stick is in neutral before cranking. For an automatic, ensure the selector is in Neutral or Park. Both require fanning the brakes to check the 60 PSI warning and the 20-45 PSI valve pop-out.
Disclaimer
The information provided on The TruckerMann is for general informational and educational purposes only. While every effort is made to ensure the accuracy and reliability of the content, trucking laws, FMCSA regulations, DOT requirements, safety standards, and industry policies can change at any time. Readers are encouraged to verify all information with official government agencies, professional advisors, or qualified industry professionals before making business, legal, financial, safety, or compliance-related decisions.
The content shared on this website reflects personal opinions, experiences, research, and commentary and should not be considered legal, financial, medical, tax, or professional advice. The TruckerMann and its owners, contributors, affiliates, or representatives are not responsible for any losses, damages, violations, penalties, or liabilities resulting from the use or misuse of information found on this website.
Some content on this website may contain affiliate links, sponsored content, or promotional material. This means we may earn a commission at no additional cost to you if you choose to purchase through certain links.
By using this website, you agree that you do so at your own discretion and risk.