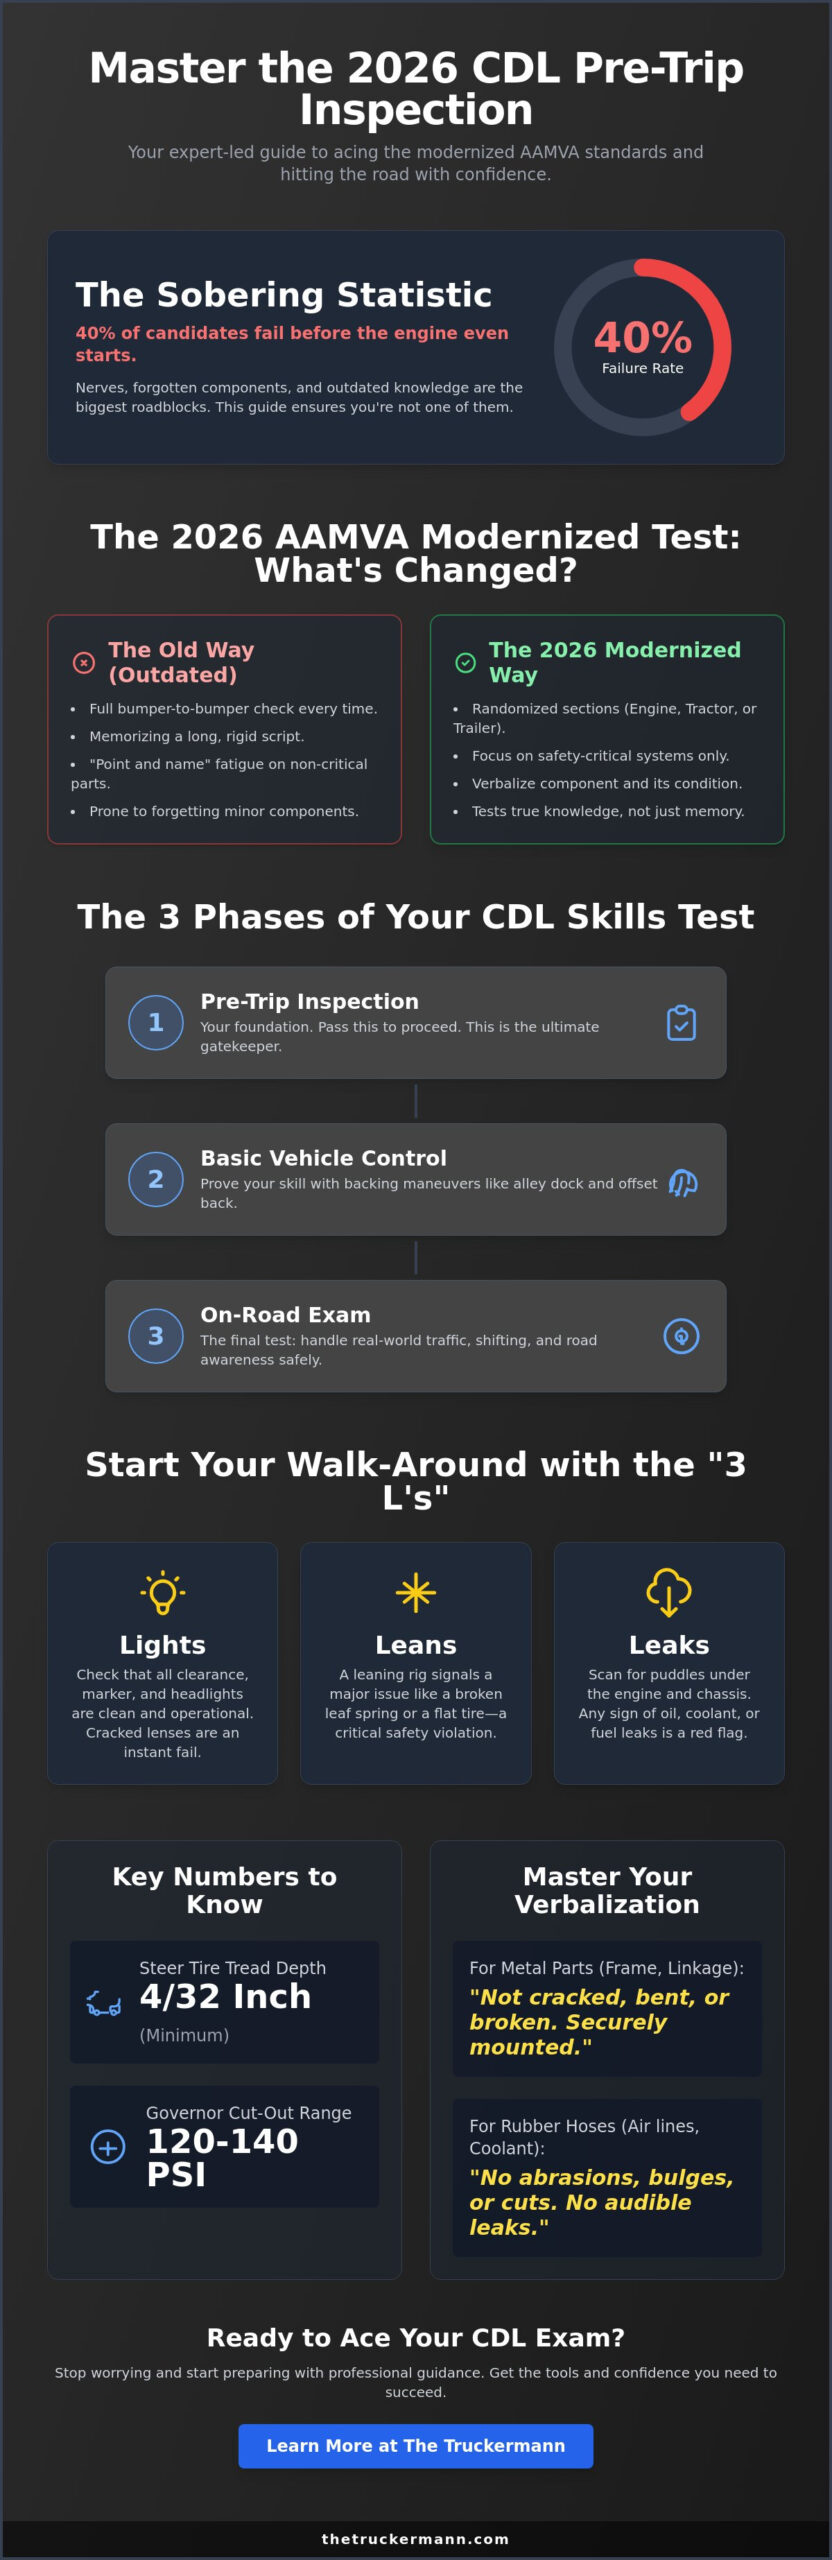
Did you know that 40% of candidates fail their pre trip inspection for cdl before they even put the truck in gear? It’s a sobering reality, especially when you’ve spent weeks dreaming of the open road only to be tripped up by a nervous stumble during the air brake test or a forgotten component name. We’ve all been there, standing in front of an examiner who seems to be looking for any reason to check the “fail” box while you’re trying to remember if it’s 20 or 45 PSI for that valve to pop. The pressure is real, but it doesn’t have to break you.
You don’t have to be part of that failure statistic. This guide serves as your veteran-led briefing on the modernized 2026 standards, designed to replace that pre-test anxiety with the steady, rhythmic confidence of a driver who knows their rig inside and out. We’re going to master the essential 7-step inspection method together. You’ll get a repeatable script and a clear understanding of the “Pass/Fail” criteria that examiners actually look for. We’ll dive into the 2026 regulatory facts, from the 4/32 inch steer tire depth to the 120-140 PSI governor cut-out, so you can walk that walk-around with absolute certainty.
Key Takeaways
- Adapt to the 2026 AAMVA modernized testing model to ensure you aren’t studying outdated standards that lead to an automatic fail.
- Master the “3 L’s”—Lights, Leans, and Leaks—during your pre trip inspection for cdl to catch critical chassis issues before they become DOT violations.
- Learn the exact verbal script needed to verify the fifth wheel assembly and glad hand seals, ensuring your tractor-trailer bond is ironclad.
- Execute the “Safe Start” ritual and the high-stakes air brake test with the precision required to satisfy even the toughest examiner.
- Build the muscle memory needed to name every component under pressure by using yard-based repetition and the “Buddy System” simulation.
Mastering the Modernized CDL Pre-Trip Inspection in 2026
The pre trip inspection for cdl is the first time you’ll really feel the examiner’s eyes on your back. In 2026, the American Association of Motor Vehicle Administrators (AAMVA) has fully rolled out the modernized testing model across the country. This isn’t just about reciting a script from a dusty manual anymore. It’s about proving you are a sentinel for road safety who understands the “why” behind every check. This Commercial Vehicle Inspection Overview highlights how these rigorous standards keep the industry moving safely and efficiently.
Examiners are looking for a straight-shooter who treats the truck like their own livelihood. If you move with purpose and speak with authority, you’ve already won half the battle. The modernized test actually helps you by cutting out the “point and name” fatigue of checking every single non-critical bracket. Instead, it focuses your energy on safety-critical systems. This means you spend more time on things like steering linkage and brake components, and less time on parts that don’t directly impact your ability to stop 80,000 pounds of steel. It’s a more logical, professional approach to the yard.
To better understand the flow of a modern inspection, watch this complete guide walkthrough:
The Three Phases of the CDL Skills Test
Think of your exam as a three-act play. If you mess up the first act, the curtain closes before you ever get to the road. You must respect the order of operations to keep the examiner on your side.
- Phase 1: The Pre-Trip Inspection. This is your foundation. You can’t even start the engine for the next phase if you fail this. It’s the filter that separates the pros from the hobbyists.
- Phase 2: Basic Vehicle Control. Here, you’ll handle backing maneuvers. You’ll show you can place the rig exactly where it belongs in an alley dock or offset back without hitting a cone.
- Phase 3: The On-Road Exam. This is the final stretch. You’ll prove you can handle real-world traffic, shifting, and situational awareness while keeping the public safe.
Modernized vs. Traditional Inspection: What’s Different?
The biggest shift in 2026 is the randomization of the test components. You won’t always do a full bumper-to-bumper check. Instead, examiners typically assign you Section A (Engine Compartment), Section B (Tractor/Truck), or Section C (Trailer). This forces you to know the whole rig rather than just memorizing a single sequence. This approach ensures that your pre trip inspection for cdl knowledge is deep, not just wide.
Another major update is the move toward “Checklist-style” verbalization. You’re expected to name the component and explain exactly what you’re looking for. You might say “not cracked, bent, or broken” for metal parts, or “no abrasions, bulges, or cuts” for rubber hoses. Since every state handles the transition slightly differently, always verify your local DMV’s specific adoption of the 2026 standards before you show up. Being prepared for these nuances shows the examiner you’re a professional who does their homework.
The Walk-Around: Inspecting the Engine and Front Axle
Before you even pop the hood, your pre trip inspection for cdl begins with a wide-angle view of the rig. You’re looking for the “3 L’s”: Lights, Leans, and Leaks. A leaning truck often screams a broken leaf spring or a dangerously low tire, while a puddle under the chassis tells a story of a failing seal or a ruptured hose. This initial scan isn’t just a good habit; it’s a legal requirement under the FMCSA Pre-Trip Inspection Regulation. You are the sentinel of this machine. If you miss a “Driver Observed” violation during this phase, you’re handing the DOT a reason to pull you off the road. In 2026, with only 7% of carriers passing compliance reviews cleanly, your attention to detail is your best defense.
Under the Hood: Fluids and Belts
Pop the latches and dive in. You’re checking the “Lifeblood” fluids: oil, coolant, and power steering. Don’t just point; tell the examiner you’re looking for levels above the refill mark. You need to identify the water pump, alternator, and air compressor. The make-or-break moment here is the drive mechanism. You must specify if a component is belt-driven or gear-driven. For belts, verify there is no more than 3/4 inch of play. It’s these technical nuances that prove you’re ready for the responsibility of the road. If you’re looking to sharpen these skills before test day, consider checking out some pro driver resources to stay ahead of the curve.
Suspension and Braking Systems
Moving to the front axle, you’re looking for the “ABCs” of rubber: No Abrasions, Bulges, or Cuts on your hoses or those critical steer tires. Remember, steer tires need a minimum of 4/32 inch tread depth in 2026. Check your leaf springs for shifts or cracks and ensure U-bolts are tight. When you hit the brakes, you’re inspecting the drums and linings for heat cracks or grease contamination. Check the push rod travel too. It shouldn’t pull more than 1 inch with the brakes released. Finally, trace the steering linkage from the column down to the tie rod. Every castle nut must be present and secured with a cotter pin. If it’s metal, it shouldn’t be cracked, bent, or broken. If it moves, it should be greased and secure.
- Steering Column: Not bent or damaged; secure with no excessive play.
- Steering Gear Box: Securely mounted; no leaks.
- Pitman Arm and Drag Link: All joints and sockets are tight.
- Shock Absorbers: Securely mounted; no oil leaks.
Coupling and Trailer: Securing the Connection
Once you’ve cleared the engine and front axle, it’s time to move to the heart of the tractor-trailer bond. The coupling area is where your skills as a professional truly show. You aren’t just looking for metal parts; you’re looking for the integrity of the marriage between your rig and your load. This part of the pre trip inspection for cdl is high-stakes because a failure here means a dropped trailer or worse. Start by checking your air lines and electrical pigtail. Ensure the lines aren’t tangled, dragging, or chafing against the frame. Your glad hand seals must be soft, pliable, and free of cracks to prevent the air leaks that can lead to an automatic test failure. For those of you moving specialized loads, understanding the nuances of your equipment is vital, so take a moment to review The Best Flatbed Trucking Gear for Logistics & Securement in 2026 to see how the pros stay safe.
The Anatomy of a Safe Connection
Get your flashlight and look under the trailer. You need to verify that the trailer apron is sitting flat on the fifth wheel skid plate with absolutely no gap. If you see light between them, you’re not coupled correctly. Check that the skid plate is properly greased to allow for smooth turning. Most importantly, look inside the throat of the fifth wheel. The locking jaws must be fully closed around the shank of the kingpin, not the head. Ensure the release arm is pushed all the way in and the safety pin is engaged. If your rig has a sliding fifth wheel, check that the locking pins are fully extended and the air line to the release cylinder isn’t leaking.
Trailer Integrity and Cargo Securement
Walk the length of the trailer and treat the chassis like a sentinel. You’re looking for cracks in the crossmembers and ensuring there are no holes in the floor. The landing gear must be fully raised, and the crank handle should be stowed securely in its bracket. Don’t forget the DOT reflective tape. It needs to be clean and cover at least 50% of the trailer sides. Check your tandem release arm and ensure the locking pins are through the rail holes. In the real world, your safety depends on using high-quality trucking gear to keep your cargo from shifting during a hard brake. A thorough pre trip inspection for cdl proves you respect the machine and the lives of everyone sharing the road with you.
- Fifth Wheel Skid Plate: Properly greased; securely mounted to the platform.
- Kingpin: Not bent or cracked.
- Air and Electric Lines: Securely stayed; no leaks or exposed wires.
- Landing Gear: Support frame not damaged; no missing parts.
The In-Cab Inspection and the “Make-or-Break” Air Brake Test
Climbing into the driver’s seat marks a critical shift in the exam. You’ve proven you can spot a leak or a cracked leaf spring; now you have to prove you can operate the “brain” of the rig. The “Safe Start” ritual is your first move, and it’s non-negotiable. Ensure your parking brakes are set and the transmission is in neutral. As you turn the key to the “on” position, watch the ABS light cycle and check your voltmeter; it should read between 12 and 14 volts in a healthy 2026 system. Cranking the engine without this sequence is a fast track to a fail. This is the heart of the pre trip inspection for cdl, where your discipline is tested as much as your knowledge.
Before you dive into the air system, verify your survival gear. You need a fire extinguisher that’s fully charged and securely mounted, three red reflective triangles, and a box of spare fuses. Check your gauges as the engine warms up. Your oil pressure should be rising, and your water temperature should be climbing toward the operating range. Most importantly, watch those air needles. You’re looking for the governor to cut out between 120 and 140 PSI. If you want to make sure your cab is professional and compliant, check out the latest equipment guides at thetruckermann.com.
The 4-Part Air Brake Test Sequence
This is the most stressful part of the exam for many, but it’s just a logical sequence. If you follow this script exactly, you can’t fail. Remember to physically point to the gauges as you explain each step to the examiner.
- Step 1: Applied Leakage Test. With the engine off and the key in the “on” position, release your tractor and trailer brakes. Press and hold the brake pedal for one minute. For a combination vehicle, you cannot lose more than 4 PSI in that time.
- Step 2: Low Air Warning Signal. Fan the brake pedal until the low-air warning light and buzzer activate. This must happen before the pressure drops to 60 PSI.
- Step 3: Spring Brake Pop-Out. Continue fanning the brakes. Both the tractor protection valve and the trailer air supply valve must pop out between 20 and 45 PSI.
- Step 4: Service Brake Check. Restart the engine and build pressure to 100 PSI in 45 seconds or less. Move the vehicle forward at 5 mph and apply the service brake. The truck should stop smoothly without pulling to either side.
Internal Controls and Visibility
Visibility is your best friend on the highway. Check your windshield for any cracks or obstructions and ensure your mirrors are clean and adjusted for your view. Run the wipers and washers to prove they work. You also need to test both the city horn and the highway air horn. Finally, flip on the heater and defroster. In 2026, examiners want to see that you can keep that glass clear during a sudden frost or a heavy downpour. It’s about being prepared for the reality of the field, not just the yard.
Ace Your Exam: Practice Tips from the Driver’s Seat
Getting that plastic in your wallet is about more than just knowing where the oil dipstick is. It’s about rhythm. You’ve got to live in the yard until the pre trip inspection for cdl becomes muscle memory. Forget the textbooks for a minute. You need to stand in the dirt, feel the grease on the fifth wheel, and smell the diesel. This is where the pros are made. Repetition is the only way to silence the nerves that strike when an examiner climbs into your cab with a clipboard. If you’re still looking for the right program to hone these skills, check out CDL Commercial Trucks Training LLC to ensure you’re getting the best ELDT preparation available in 2026.
Use the “Buddy System” to simulate the examiner’s scrutiny. Have a partner stand there while you perform your walk-around. Don’t just talk; use the “Point, Touch, and Name” technique. If you just point, the examiner might think you’re guessing. If you touch the component, you prove you’ve actually inspected it for security and damage. This physical engagement makes your presentation authoritative and leaves no room for doubt. It’s the difference between looking like a student and acting like a professional driver.
Developing Your Inspection Rhythm
Consistency is your best friend when the pressure is on. Always inspect in the same order: Top-to-Bottom, Front-to-Back. This logical flow ensures you never skip a critical safety item like the steering linkage or the air compressor. Use a pre trip checklist cdl as your mental anchor during practice. By the time test day rolls around, you won’t be searching for words. You’ll be delivering a professional briefing that shows you respect the machine and the regulations.
Transitioning from the Test to the Road
Passing the exam is just the entry fee. Once you’re out here for real, the stakes get higher. The CDL test is a memory game, but a real-world DOT inspection level 1 checklist is a hunt for violations. Remember, the average out-of-service penalty in 2026 is $4,200. That’s a massive hit to your livelihood that a simple fifteen-minute walk-around could have prevented. Your pre-trip is your best defense against roadside scrutiny and the mechanical failures that cause 14,000 accidents annually. It’s not just about the license; it’s about the lifestyle.
You have the grit to handle this industry. Now, show them you have the expertise to master it. The pre-trip is where your reputation as a safe driver begins. Treat every inspection like a mission. We’re all out here together, and your diligence keeps us all moving safely. Hit the yard, run the script, and earn that seat.
Claim Your Seat in the Cab with Confidence
You’ve walked through the grit of the engine bay, verified the ironclad bond of the coupling, and mastered the high-stakes rhythm of the air brake test. By now, you know that the pre trip inspection for cdl isn’t just a hurdle to jump; it’s the professional foundation that keeps you out of the “out-of-service” lane and protects your livelihood. We’ve focused on the 2026 AAMVA modernized standards because the old ways won’t cut it when you’re standing in front of an examiner today. This isn’t corporate fluff from a desk manual. It’s the fraternal wisdom of veterans who have spent years in the yard and on the shoulder, filtering complex regulations into actionable advice.
Success in this industry belongs to the prepared. If you want to move from the yard to the highway with absolute certainty, don’t stop here. Ready to master the road? Check out the full 2026 CDL Pre-Trip Master Guide here! You have the tools, the technical specs, and the straight-shooter mindset required to pass. Now, go back to the yard, touch those components, and prove you’re the sentinel our roads need. We’ll see you on the white line.
Frequently Asked Questions
What is an automatic fail on the CDL pre-trip inspection?
Failing any part of the 4-step air brake test results in an immediate automatic fail. This includes missing the low-air warning buzzer or the spring brake pop-out points. Safety-critical items like steer tires with less than 4/32 inch tread or missing a major steering component will also end the test. If you bypass a major safety defect or skip the air brake check entirely, the examiner will stop the exam before you ever reach the road.
How long does the average CDL pre-trip inspection take?
You are typically given between 30 and 40 minutes to complete the pre trip inspection for cdl. This timeframe is plenty of time if you’ve developed a steady rhythm in the yard. Don’t rush the verbalization. Use your time to touch and name each component clearly. If you move too fast, you risk skipping a “make-or-break” item that could cost you the license.
Do I need to memorize a specific script for the pre-trip?
You don’t need to memorize a word-for-word script, but you must use the correct technical names for every component. Examiners want to hear specific phrases like “not cracked, bent, or broken” for metal and “no abrasions, bulges, or cuts” for rubber. It’s about demonstrating professional knowledge rather than reciting a poem. Focus on the condition and security of each part you touch during your pre trip inspection for cdl.
Can I use a checklist during the actual CDL pre-trip exam?
Most states treat the pre-trip as a memory-based exam and don’t allow the use of a personal checklist. However, the 2026 modernized standards in some jurisdictions provide a basic, non-descriptive checklist of items to ensure you don’t miss a section. Always verify your state’s specific rules before testing day. Even if a list is provided, it won’t tell you what to say about the components.
What happens if I forget one part during the walk-around?
Forgetting a single non-critical part usually just costs you points rather than causing an immediate fail. You can often go back and mention a component if you realize you missed it, as long as you haven’t moved to the next phase of the test. The key is to stay calm and keep your rhythm. One missed bolt won’t kill your chances, but losing your composure might lead to bigger mistakes.
How has the modernized CDL test changed the pre-trip in 2026?
The 2026 modernized test uses a randomized approach, often assigning you only one section of the vehicle (A, B, or C) instead of the full rig. This change reduces the “point and name” fatigue by focusing on safety-critical systems. It requires a deeper understanding of the components you’re assigned rather than just a surface-level walk-around of the entire tractor-trailer. It’s a more professional, logical way to test your expertise.
Is the air brake test the same for Class A and Class B licenses?
The core of the air brake test is similar, but Class A drivers must also verify the trailer air supply and tractor protection valves. Class B drivers only focus on the single vehicle’s system. In a combination vehicle, your leakage test allows for a 4 PSI drop per minute, while a single vehicle is restricted to only 3 PSI. Always practice on the specific class of equipment you plan to drive.
What should I do if the examiner interrupts my flow?
If an examiner asks a question or interrupts your flow, answer clearly and then take a second to reset. Don’t let it rattle your confidence. A quick pause helps you find your place in your internal checklist. Most examiners just want to see if you actually understand the system or if you’re just reciting a script. Treat it like a professional conversation between two drivers who respect the rig.
Disclaimer
The information provided on The TruckerMann is for general informational and educational purposes only. While every effort is made to ensure the accuracy and reliability of the content, trucking laws, FMCSA regulations, DOT requirements, safety standards, and industry policies can change at any time. Readers are encouraged to verify all information with official government agencies, professional advisors, or qualified industry professionals before making business, legal, financial, safety, or compliance-related decisions.
The content shared on this website reflects personal opinions, experiences, research, and commentary and should not be considered legal, financial, medical, tax, or professional advice. The TruckerMann and its owners, contributors, affiliates, or representatives are not responsible for any losses, damages, violations, penalties, or liabilities resulting from the use or misuse of information found on this website.
Some content on this website may contain affiliate links, sponsored content, or promotional material. This means we may earn a commission at no additional cost to you if you choose to purchase through certain links.
By using this website, you agree that you do so at your own discretion and risk.
Leave a Comment